Tampilkan postingan dengan label part. Tampilkan semua postingan

Jumat, 24 Juni 2016

If youve been following this blog lately, you know that were engaged in a multi-week battle of wits with a pile of eggshells.  Specifically, were trying to figure out a way to isolate calcium carbonate from eggshells to use as a leavening agent.  The calcium carbonate is bound up in a matrix of protein that makes it less accessible for leavening action, so for maximum leavening effect, we have to either dissolve away the protein or dissolve away the calcium carbonate and then regenerate it.  Last week, we tried boiling ground-up eggshells in lye to dissolve away the protein.  (It didnt work very well, but at least the biscuits were tasty.) Today, we take a look at the other option--dissolving the calcium carbonate and regenerating it.


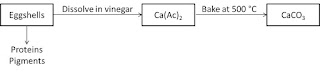
Hypothetical route from eggshells to calcium carbonate; doesnt work in real life
The first thought we had was that the CaCO3 in the eggshells can be dissolved by the acetic acid in vinegar to make calcium acetate (Ca(Ac)2), which can be decomposed to CaCO3 around 400 °C.

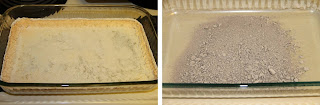
Calcium acetate calcined at ~500 °C
Unfortunately, some of the eggshell proteins are also apparently soluble in vinegar, and when we made calcium acetate by dissolving eggshells in vinegar and evaporating all the liquid, we ended up with a light-brown colored solid, which yielded a gray powder after a clean cycle in the oven (which gets close to 500 °C).  We got a similar looking powder when we put ground whole eggshells through the oven clean cycle.

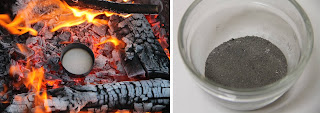
Ground eggshells in rocket stove
The product from calcining eggshells in the rocket silo was actually a little darker colored.  As a point of reference, were looking for CaCO3 as a fine, white powder.


This is actually a problem thats bothered us since we wrote about grinding up eggshells way back when this blog was just an infant.  While its usually possible to burn organic matter (e.g., proteins) off of inorganic residue (e.g., wood ash, glass, stainless steel) at 400-500 °C (750-930 °F), eggshells hold on to the organic matter from their protein until 900 °C (1650 °F).  Unfortunately, at that temperature, our desired CaCO3 has transformed into lime (calcium oxide, CaO).  Thus, its no surprise that when we put a pile of eggshells in our oven and set it to the clean cycle, our pile came back grayish-colored instead of the white color of pure CaCO3. (Although, we were surprised at the time since we hadnt done much reading on the topic!)

So, were 0-for-2 on getting our pure CaCO3 out of the eggshells at this point, but its worth noting two things.  First, while we havent been able to get pure CaCO3 from eggshells, the gray powders from either the decomposed eggshells or the decomposed calcium acetate react much more vigorously with vinegar than the raw eggshells.  Still not as vigorously as baking soda as the video below shows, but bubbles abound nonetheless.  So, maybe the gray powders are worth trying as leavening. 


Second, can we approximate a best-case scenario for obtaining pure CaCO3 from eggshells?  Yes! We can get a bag of pure CaCO3 for a couple bucks at the local homebrew store.  So while our blog post declaring victory on purifying CaCO3 from eggshells will have to wait until another day, we can still see what a best-case scenario for eggshell-based leavening would look like. Biscuit baking time!

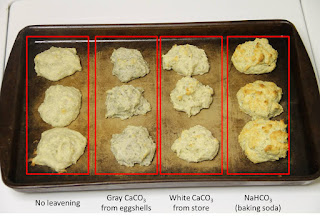
Biscuit leavening comparison: no leavening, calcium carbonate, and baking soda
Same recipe as last time, but only four sets this time: no leavening, gray CaCO3 from eggshells, white CaCO3 from the homebrew store, and NaHCO3 (baking soda).  Very similar results as last time, too.  The gray CaCO3 biscuits are definitely more risen than the no leavening control, and similar to the biscuits we baked last week from raw and lye-boiled eggshells.  The white CaCO3 biscuits were noticeably more risen than the gray CaCO3 biscuits, but still couldnt hold a candle to the baking soda biscuits.

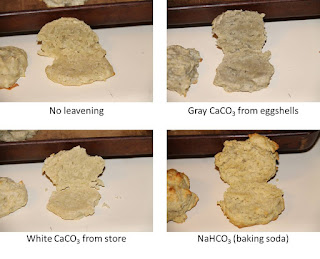
Biscuit texture comparison: no leavening, calcium carbonate, and baking soda
The textures of both sets of CaCO3 biscuits were similar to last weeks results, too. Not completely cooked through at the 20 min mark, while the baking soda biscuits were definitely done. 

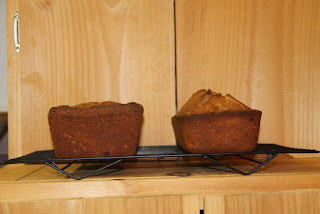
Banana bread leavening comparison: calcium carbonate and baking soda
The effect is more pronounced for banana bread.  Can you guess which loaf used gray CaCO3 from eggshells as leavening? (Hint: its not the one on the right--that one had baking soda.) The grand conclusion from all these experiments?  Even though the CaCO3 releases carbon dioxide gas when mixed with an acid (same action as baking soda), the slower reaction kinetics mean that eggshell-based leavening cant get the job done.


Have you ever baked with eggshells or tried to isolate CaCO3 from them?  How did it turn out?


Read More..

Kamis, 23 Juni 2016

On Thursday, we posted about historical methods to drip lye and some of the chemistry associated with it.  Today, we wanted to talk about measuring the strength of the lye to check if its concentrated enough for making soap.  In the olden days, that was often done with some sort of density test, either by floating an egg or potato, or matching the density of the lye solution with a saturated table salt solution (sodium chloride, NaCl).  An egg has a density of 1.03-1.1 g/mL, and a saturated NaCl solution is a little more precise at right around 1.2 g/mL, but in our soap calculations, we normally use a solution that is 1.3 g/mL, according to density-sodium hydroxide concentration correlations.  One initial conclusion from that is that old-time soap makers probably used less concentrated lye solutions.  Similarly, older soap recipes often call for cooking the lye water and fat together (i.e., hot process soaps), which probably boils off a lot of the extra water.

For modern homesteaders, who might have a scale and measuring cup handy, it would be much more precise just to measure the density of the lye solution directly.  (A graduated cylinder would make this calculation--and other density calculations you might want to do--more precise, but a measuring cup, used judiciously, should be good enough.

Another technique is to use a pH indicator and either dilute a small (representative) portion of the lye water or titrate it with an acid (such as vinegar) to find the strength of it.  The pH indicator would also be useful during the soapmaking process to check the progress of the saponification reaction.

Lets take a look at each of those techniques in more detail.

To make soap, we normally use a ratio of something like 2.89 oz NaOH to 7.87 oz water, which works out to about 26.9 wt% NaOH.  According to the above calculator, that should give us a solution density of 1.29 g/mL.  (The analogous numbers for KOH lye would be 4.06 oz KOH to the same amount of water, giving 34.0 wt% KOH, and a density of 1.33 g/mL.)  If we take an egg density of 1.1 g/mL, we can calculate the amount of water that should be displaced by the egg if we know the volume of it.

A typical large egg has a mass of 57 g, corresponding to a volume of 51.8 mL.  Buoyancy dictates that the egg should displace 57 g of the lye solution, which will correspond to a volume less than 51.8 mL if the lye solution is more dense than the egg (which it should be if the egg is floating). As an approximation, we can find an equation for an egg and make a graph to see how much of the egg should be above the water for a quarter-sized interface.

The egg equation came from here, but we normalized it to match the dimensions of an actual egg.  We assumed that an egg was sufficiently symmetrical to use a 2-D projection and calculate areas instead of using a 3-D model and calculating volumes.  In reality, the egg will sit with the skinny end slightly lower in the water since the air pocket is toward the flatter end.  In any case, leaving an area the size of a quarter above the surface would require a lye density of 1.13 g/mL, which is considerably less dense than our standard recipe, which has a density closer to 1.3 g/mL.  If the egg were a little less dense (toward the 1.03 g/mL end), it would sit higher.  As a point of reference, a potato has a density near 1.09 g/mL, in the same range as an egg.

This is a real egg in our standard lye solution (using NaOH).  The solution is yellow because we were testing pH indicators with it (described below).  The real egg looks not too far off of the graphical one, but there are more precise ways to test the lyes strength. 

For example, using data found here (and their related NaOH calculator), we can make a correlation, measure the density of the lye directly, and use the correlation to calculate the concentration.  It would help to have a digital scale and a graduated cylinder, but you can probably get at least as close as the egg/potato method with an old spring-loaded scale and a measuring cup.  We dripped a small batch of lye recently and were doing tests with it, but accidentally spilled it in the kitchen sink before we could test this method.  For lye dripped from ashes, use the KOH equation.  Note that if our solution density is 1.3 g/mL, our lye concentration (as KOH) is about 34 wt%, or 5.2 molar.  This density method will be our favorite lye strength test going forward.

Another way to test the strength is with a pH indicator.  One natural pH indicator is cabbage juice, which contains anthocyanidin pigments.  (As an aside, we noticed similar color changes in elderberry juice and wondered why; elderberries have a similar set of pigments.)  These pigments change structure as the pH of a solution changes, with each structure having a different color.  See here for more info.

The pigment structures of the cabbage anthocyanidins look something like this, with the different colors as shown.  Part of the reason the change from red to purple happens over such a wide pH range is the colorless intermediate.  Similarly, the yellow compound starts to form at pH > 8, but doesnt become the dominant form of the molecule until much higher pH (the presence of both yellow and blue make the solution green, kind of like a Ziploc bag).  The "R" groups are glucosides (i.e. substituted glucose molecules).  Sources for this figure came from here, here, and here.  If you took note of the concentrations above (i.e., that our standard soap recipe calls for 5.2 molar lye) and you are familiar with the pH scale, you might realize that theres a bit of a problem here.  That is, our lye should be at pH 14.7, but our indicator will be yellow at every pH > 11.

Fortunately, we can dilute a small, representative portion of the lye to bring it into the pH range where the indicator is effective.  On the far left in this picture is an undiluted lye solution we dripped from some wood ashes a few weeks back; its yellow, which means the pH is at least 11.  Since pH is measured on a log scale, diluting by a factor of 10 (conveniently 1 teaspoon solution plus three tablespoons water) should decrease the solution pH by one unit (assuming the water is actually neutral).  On the first dilution, the solution is already green!  That means the undiluted solution was not much over pH 11.  The further dilutions (using one teaspoon of the first dilution plus three tablespoons water, etc.) are consistent with that conclusion, looking similar to pH 9 and pH 7-8  solutions above.  The upshot of this technique is basically (heh) that if the lye is concentrated enough for soapmaking, it should take at least four 1:10 dilution steps to show a color other than yellow.  Alternatively, that means that we should concentrate our lye solution by a factor of 1000 before using it to make soap.  Unfortunately, we only made around a quart to begin with, so well only be left with a few drops at the end--not enough to do much with (even dissolve a feather, which was another test of lye strength we were going to try).

Another approach would be to titrate the lye with an acid, and figure out how much acid we needed to observe a color change.  Maybe that will be the subject of a future post.


Guess well just have to dry it down with waste heat from the oven (after baking bread or something) and store it in a jar until we can make some more!

Also, in case youre interested, heres how we made the pH indicator solution.  We chopped about a third of a cabbage to give around four cups chopped cabbage.

Then we poured about two cups boiling water onto the cabbage and let it steep for about two hours.

Then we strained out the cabbage (and made coleslaw!), leaving this dark purple-colored liquid.  We add about a teaspoon of this cabbage tea to a cup of liquid to test the pH. Its a little-known fact that a hot jar of this liquid was the inspiration for both the band name Deep Purple and their hit single Smoke on the Water.  (Dont bother looking that up.)

Have you dripped lye from wood ashes?  What did you use it for?  How did you test the strength?  Let us know in the comments section below!


Read More..

Senin, 06 Juni 2016

Part I of Aquaponics in New England discusses how aquaponics can supplement the offerings of traditional farming and fishing where they have limits. A PDF of the entire paper (Parts I-III) can be downloaded here, including a full list of sources referenced by footnotes.

Supplement Traditional Farming & Fishing
 
First, it is important to understand the current state of agricultural affairs in Massachusetts. After a precipitous decline in the 1960s, the number of farms in the state is now on the rise (see Figure 1). As of 2008, the state had more than 7,700 farms (including aquaculture and nurseries).1 Many of these farms have hit on effective and profitable strategies, such as Community Supported Agriculture, farmers markets, and/or organic certification. The growth is fueled significantly by organic agriculture. Between 1997 and 2008, the number of farms in Massachusetts increased 28% while the number of organic farms increased over 3,000% (from 3 to 103).1


Traditional Farming
Despite the growth, traditional farming has limits in Massachusetts. Whether organic or not, traditional farms have a limited growing season. Many cold hardy species...
Read more »
Read More..

Rabu, 01 Juni 2016

One thing thats not done as much anymore as it should be is making lye on the homestead.  A major contributor to this phenomenon is likely the abundant scary stories and mystique of danger surrounding lye because of some horrible accidents in the past and a general fear of the unfamiliar.  This isnt to say that lye isnt dangerous--it certainly deserves a healthy respect and some reasonable precautions--but, like most things, having an awareness of the properties and dangers is a better approach than running away screaming or cowering in the corner like a congressman.

Ok so, newly emboldened about the utility of lye, lets take a look at why you would want to make your own.  Other than not having to buy an ingredient for your soap-making days, starting with a potassium-based lye instead of a sodium-based one (typically whats available commercially) makes it easier to recycle the soap as part of your graywater scheme since you dont have to worry about sodium buildup.  (Plants need more potassium than sodium.)   In addition to soapmaking, youll save on ingredients for your homemade drain cleaner, biodiesel (if you get really good at making lye), and lutefisk recipes.

Back in the olden days, when soap making was a standard activity on the homestead, the source of lye was normally wood ashes.  (Even back then, folks knew that grass ashes (e.g., from corn cobs) gave more lye than wood ashes, but no one burned grass in significant quantities.)  The goal was to leach the soluble lye, mostly potassium hydroxide (KOH) in this case, out of the wood ashes, leaving the insoluble parts behind and obtaining a concentrated lye solution.  More generally, however, wood ashes were leached to collect potash: an umbrella term for soluble potassium salts, which could contain potassium hydroxide (KOH), potassium carbonate (K2CO3), potassium chloride (KCl), etc.  The potash was commonly evaporated to dryness and sold as fertilizer when it wasnt used to make lye for applications around the homestead.  And, as with most old homesteading practices, there is an interesting confluence (to us, anyway) of chemistry and history around the lye-leaching process.

Traditional lore says that lye should be leached from hardwood ashes, especially hickory. The reason hardwoods, and especially hickory, should be the best has puzzled us for a long time, since modern methods suggest that softwoods contain no less potassium than hardwoods, at least inherently.  However, old sources also show some data confirming that indeed, less potash is obtained from softwood ashes than hardwood ashes.  Why should that be the case?  We can think of two possible (but contradicting) explanations, neither of which we can find confirmation for.

First, many sources assert that softwoods contain more resins (although we havent been able to find any quantitative measurements), and thus burn hotter than hardwoods.  The modern source linked above shows that ashes from wood combusted at temperatures above 900 °C lose a significant amount of potassium to evaporation.   Thus, if softwoods burn at 950 °C and hardwoods at 700 °C, softwood ash would likely contain less potassium than hardwood ash.  However, 900 °C is a very high temperature, especially for the open-air fires common before the turn of the last century.

We think its more likely that softwoods dont burn as cleanly, and more of the inherent potassium remains locked up in the incompletely burned remains.  Some experimental evidence from the period suggests that leach-resistant potassium can indeed be found in incompletely burned softwoods.  (On the other hand, that may mean that softwood biochar is more beneficial for the garden than hardwood biochar as a slow-release potassium fertilizer.)

In any case, it seems legitimate that hardwood ashes are preferable to softwood ashes for making lye, and a clean-burning, fairly hot fire (but less than 900 °C) is the best way to get those ashes.

Also, some old lye recipes call for adding lime or slaked lime to the ash-leaching barrel.  The reason for this addition is clear:  in water, lime (calcium oxide, CaO) becomes slaked lime (calcium hydroxide, Ca(OH)2), which reacts with potassium salts, such as potassium carbonate (K2CO3) to form calcium carbonate (CaCO3) and potassium hydroxide (KOH, the lye we want!).  Depending on conditions, however, the majority of potassium may be leached as the hydroxide anyway, so the lime may only give an incremental increase in lye yield.  Many lye makers dont bother with the lime and still make fine soap, so it seems that the lime must be optional.  For fancy-pants lye making only, if you will.


Additionally, lye leached in traditional ways often times comes out transparent-ish, but very brown-colored.  The reason is that the layers in a lye-leaching bucket normally included a layer of sticks, a layer of straw, and then the ashes.  The lye leached from the ashes can start to decompose the straw and/or sticks, which yield the brown-colored compounds (primarily from solubilized lignin components).  Leaching the lye through a different material, like a tightly-woven t-shirt (multiple layers), or leaching through the straw so many times that all the brown parts are dissolved, would probably yield a clear lye solution.

Finally, many sources indicate that lye should be leached from ashes using distilled (or rain, or soft) water.  For leaching lye per se, water hardness shouldnt make much difference (see paragraph above about adding lime), but if you plan to make soap from the lye down the road, it will be beneficial to not have the hardness in the water.  The cations in hard water are divalent (+2 charge), which means they will take on two soap molecules, become essentially nonpolar, and precipitate out of the aqueous solution, almost exactly like a Dementor eating someones soul (if one soul = two soap molecules).

The setup for a lye-dripping (leaching) trough, as described in several old books.  It could also be a barrel with a plug in it.  Dont forget to put a bucket under the arrow, or your lye will run out onto the ground.  For other setups, see here, here, and here.

 After leaching the lye, it should be tested for strength.  There were a number of traditional methods, including floating eggs or potatoes, dissolving feathers, and making sure it tastes incredibly bitter.  (Dont try the last one).  Modern techniques include testing the pH and/or measuring the density (the latter being an updated version of the egg or potato test). 

Since this post is already very long, well wrap it up here.  Check back on Sunday for Part 2, featuring lots of pretty colors!

In the meantime, have you dripped your own lye from ashes?  What did your setup look like?  Do you have a better idea why hardwoods are better than softwoods for making lye from the ashes?  Let us know in the comments section below!
Read More..

Selasa, 10 Mei 2016

Part III of Aquaponics in New England discusses how aquaponics can fuel a significant increase in the region's food production. A PDF of the entire paper (Parts I-III) can be downloaded here, including a full list of sources referenced by footnotes. 

Help Scale Up Local Food Production

Scaling up refers to significantly increasing food production to a level well above the status quo, dramatically altering the ratio of imported to in-state/region produced food
 
Why Scale Up?
Aquaponics offers the potential to scale up local food production for Massachusetts and New England. But first, why is scaling up production important to the region? As discussed previously, locally produced food tends to produce less GHGs. It also provides an opportunity for local employment, helps to reinvest money in the state or local community, and preserves open space and rural character of the region, supporting tourism and real estate values. Local food often tastes better, too, because varieties are cultivated for their flavors. In contrast, most commercial varieties are cultivated for their ability to withstand the assault of freezing, packing, and shipping hundreds or thousands of miles.

In addition to growing demand for local food, climate change presents a major economic argument for increasing local food production. Most of the extremely high risk areas for water stress in the Tetra Tech study are in America’s major agricultural areas: the Great Plains and Southwest, including California.13 Globally, climate change will have an overall detrimental effect on agriculture, too.10 This means prices for imported food will...
Read more »
Read More..

Rabu, 27 April 2016

If you remember from a prior post last year, we made some changes to the large A-Frame NFT system that was being used over at the Together We Stand Aquaponic Gardens.  It had been designed with a manifold at the top to feed water individually at each tube and to drain each tube individually. It had so many hoses going so many directions we called it the "octopus".  Classic exacmple of over-engineering to solve a problem that didnt exist.

When I wrote about how we changed the water flow I mentioned that instead of black tubing, my hubby cut a garden hose to make the jumper from one tube to the next. It was easy, quick, and most importantly cheap!

After I posted this, several folks commented on this blog and other places about the wisdom of using a garden hose. There was quite a bit of concern about the safety of the water flowing through the garden hose and the possibility of leaching toxic chemicals.

Quite honestly, for as "smart" and evolved as we are supposed to be, it never occurred to us that the hose might taint the water.  Hubby and I  both grew up in a very hot and dry area of South Texas and drank lots of water from the hose as youngsters and teens. While it did have a funny taste, I just always guessed it was from the metal bib of the hose.  That and the fact that all the water in that town tasted like crud, no matter the source.  But when you are hot and thirsty you will drink what is available.  Of course, this was back in the 60s and 70s so we didnt know about things like bottled water back then

But this is a new century and we are evolved and enlightened!  So a few days ago, hubby decided that the garden hose should be replaced.  You spoke and he listened!


 This did require a trip to Home Depot, but it was only a few dollars and the result looks clean and works well.  I think fighting the crowd of Canadians in the parking lot and through the store on a Saturday (remember this is Hollywood Florida and it is January and in the mid-80s so all the snowbirds have landed) took longer and was more effort than making the actual change.  Here is the new set-up. 
Here is another view.

Nice huh?

But this gets me to thinking about all the things we did as kids that people never do now....or they dont allow their kids to do now.  Maybe it was because we were from a small-ish town, but we rode our bikes everywhere and got into everything. I dont know how we survived.

How about you?
Read More..

Kamis, 31 Maret 2016

A few weeks ago, we were reading a 5 Acres and a Dream blog post about making homemade leavening from wood ashes (i.e., from potassium carbonate, K2CO3), and a reader in the comments section asked if calcium carbonate (CaCO3) from eggshells, which also reacts with acid to release CO2 gas (reaction below), could be used as a leavening agent.  We had been wondering the same thing for quite a while, and the realization that other folks were wondering the same thing provided the motivation we needed to finally get up and do some experiments.

Reaction of calcium carbonate (CaCO3) in eggshells with acetic acid in vinegar
Calcium carbonate (CaCO3) reacts with acetic acid in vinegar to make calcium acetate, carbon dioxide gas (CO2), and water (H2O).

First, some eggshell chemistry.  Eggshells are about 95% CaCO3, but the CaCO3 is bound in a matrix of protein, with a proteinaceous membrane also attached. Thus, one might expect that eggshells would make a better leavening agent if the CaCO3 could be isolated from the protein (and/or ground very finely) so that it would be more accessible to the acid during baking.  The question is, how to get rid of the protein?  Well have to either dissolve the protein away from the CaCO3 or dissolve the CaCO3 away from the protein and then regenerate it somehow.  Today well try the former.

Theres quite a bit of precedent for dissolving away the eggshell protein (or at least, most of it) with a strong base, such as sodium hydroxide (NaOH) or potassium hydroxide (KOH), but specific recipes are hard to come by.  Several articles refer to this original gem, the most useful being this one, which allows us to deduce that those guys boiled their eggshells in a 2.5 wt% NaOH solution for 5 minutes, which easily removed the membrane and part of the protein matrix.  They then increased the lye concentration to 10 wt% and boiled for a long time, finding that all the protein that could be removed was gone by about 7 hours.  They didnt give a lye-to-eggshell ratio, though.  Additionally, this patent references another patent (we couldnt track down the original) claiming that boiling eggshells in 3 wt% NaOH would reduce the protein content of the shells to < 0.1%, although the boiling time and lye-to-eggshell ratio wasnt specified.

A protein content of < 0.1 wt% sounds good enough to us, so we decided to follow that route most closely.  Having to guess on the time and lye-to-eggshell ratio, we decided that if we had to boil for more than half an hour and use more than a 1:1 ratio, that it wouldnt be worth our trouble. (In that case, wed just use Leighs ash-based leavening instead!)  Alright, experiment planned; lets do this!

Starting to boil eggshells in lye water
Heres our recipe: 15 g NaOH, dissolved in 500 g tap water, with 15 g coarse-ground eggshells (1-2 mm particles) added.   Boiled for 30 min.  Wear safety glasses and gloves until everything is neutralized later on (see below).


Boiling eggshells in lye water
As the mixture simmered, the lye water turned a cloudy yellow.  A good sign that were dissolving protein.


Filtering lye-boiled eggshells
After boiling, we poured the liquid through a coffee filter (supported by a polypropylene funnel) into a quart jar.  The eggshells dont look that much different than before, except maybe slightly darker.  The pigment (they were brown shells) is still there.  The coffee filter is really slow, so something like an old t-shirt or terrycloth towel might be better.


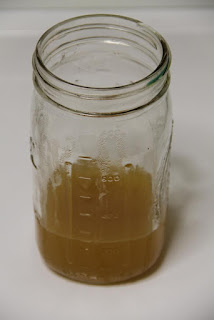
Filtrate from lye-boiled eggshells
The filtrate is still highly caustic, so be careful with it!  We wanted to neutralize it before doing anything else, so we added a couple tablespoons of our good ol red cabbage pH indicator, causing the filtrate to go from yellow to slightly-darker-yellow.  Note if youre following along at home--dumping the filtrate down the drain without neutralizing might kill some of your friendly septic system bugs, so please neutralize!


Vinegar and neutralized lye solution
Then we added vinegar until it turned green, then blue, then finally purple, indicating a neutral pH.  (We had to add a few more tablespoons of pH indicator as it got more and more dilute, because the color changes started to get hard to see.) Now it can go down the drain or into the compost.


Decreasing pH of eggshell rinses after boiling with lye
The next step is to repeatedly rinse the boiled eggshells to wash all the lye off.  These are the rinses (plus pH indicator), showing steadily decreasing alkalinity.  After the fourth rinse (which was with vinegar), the filtrate is neutral, the eggshells should be substantially free of lye (and hopefully protein!), and were good to move on (and take off our safety glasses and gloves).  We also neutralized the second and third filtrates with vinegar, too.  Safety note: working with lye on something youre planning to eat has the potential to cause some serious damage if you dont neutralize properly.  Be careful and only do this if youre comfortable with the chemistry! Also, make sure youre using pure lye, and not some cleaner that has lye combined with other chemicals.


Drying lye-boiled, neutralized eggshells
Drying the lye-boiled eggshells makes them easier to work with. In the oven at 300 °F for 15-20 min ought to do the trick!


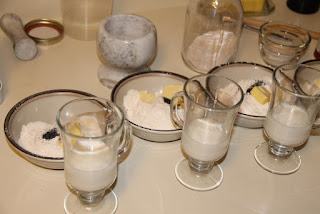
Biscuit experiment preparation
Time to make some experimental biscuits!  Five sets of three biscuits each.  Recipe per set: 0.5 cups all purpose flour, 0.25 teaspoon leavening, 0.125 (1/8) teaspoon salt, 1 tablespoon butter (in the bowls), 1 teaspoon apple cider vinegar plus milk (2%) to bring the volume up to 0.25 cups to make a faux buttermilk (in the glasses).  We processed the bowl contents in a food processor for about 5 seconds to cut in the butter, then added the "buttermilk" and processed for another 5 seconds to mix everything up, scooped the dough/batter into drop biscuits and baked at 400 °F for about 20 min.  The five sets differ only in their leavening: no leavening, lye-boiled coarse-ground eggshells, coarse-ground eggshells, fine-ground eggshells, and baking soda.


Eggshell leavening biscuit comparison
After baking, there a clear difference between the No Leavening control and the rest, but also between the baking soda and the rest.  Between the eggshell sets, the lye-boiled and the finely-ground are about equal, and slightly more risen than the coarse-ground.  However, all the eggshell sets are very close to each other, and closer to the control than to the baking soda.  Also, we didnt have enough room for all fifteen biscuits on this sheet, so we baked the third biscuit of the last three sets separately.  Their appearance was consistent with the biscuits here.  Hooray for reproducibility!


Eggshell leavening biscuit texture comparison
The textures are consistent with the appearance, but its hard to tell from the photos.  Also, the biscuits other than the baking soda set werent cooked all the way through after 20 min.  We put them back in the oven; after another 15 minutes they were no longer doughy, but they didnt rise any more.  The flavor of all the sets is decent, so the control set and the eggshell sets would make decent dumplings if youre into that sort of thing.  Overall, the conclusion from these experiments is that the eggshells provide some leavening effect, but not much.  For us, the ground eggshells dont really get the job done, and its definitely not worth the effort of boiling them in lye water to dissolve off the protein.

But were not done with these experiments yet!  Stay tuned for Part 2, where we dissolve and regenerate the calcium carbonate part, and see how that works as leavening!


Read More..

Minggu, 27 Maret 2016


Part II of Aquaponics in New England discusses how aquaponics can improve the sustainability of produce and fish production. A PDF of the entire paper (Parts I-III) can be downloaded here, including a full list of sources referenced by footnotes. 

Improve Sustainability of Local Harvest

Water Use
In addition to providing a sustainable source of fish, aquaponics has other sustainability advantages over traditional farming, hydroponics, and aquaculture. First, these techniques use a lot of water. Traditional aquaculture methods use between 0.57 and 33 cubic meters (m3) of water produce 1 kilogram (kg) of fish, depending on method8 (See Table 2). Research at the University of Virgin Islands has shown that their aquaponics system uses less than half of the water of the most productive aquaculture systems: 0.25 m3/kg.8 On average, aquaponic systems use between 90 and 99% less water than traditional aquaculture systems.9


Aquaponics also uses less water than hydroponic crop production. Aquaponic systems...
Read more »
Read More..