Tampilkan postingan dengan label chicken. Tampilkan semua postingan

Jumat, 24 Juni 2016

In the third book of her Permaculture Chicken series, Hess does a nice job of synthesizing chicken breed recommendations and statistics from other chicken authors (Gail Damerow, Harvey Ussery, Jenna Woginrich, Robert Plamondon), chicken surveys (Mother Earth News, Backyard Chickens forum), and hatchery catalogs, as well as her own experience.  This book has fewer external citations than some of her other books, but that may be because the content she would need to cite isnt out there--the main point of the book is that a homesteader needs to experiment for himself and find or make chickens that work well in his particular flock.


Hess is quick to note that different folks choose chicken breeds for different reasons, and folks who pick breeds for the same reasons in different climates might get different results. In short, take everyones advice on chicken breeds (including hers) with a grain of salt: your mileage may vary. Nevertheless, with that context set, Hess own experience is especially valuable because shes worked with many different breeds, and has refined (is refining) her flock as one big optimization exercise with the following variables:

•Egg production
•Meat production
•Foraging ability
•Predator resistance
•Flightiness-friendliness spectrum
•Broodiness/chick-rearing ability

Because there is a lot of overlap (and some mutual exclusivity) among these variables, prioritization is necessary. For example, light (weight) breeds might produce more eggs and forage well, but can be flighty enough to escape fences and wreck gardens, while only providing minimal meat after egg production drops. Are the extra eggs worth these drawbacks? If you dont like meat or vegetables with your eggs, they might be!  Fortunately, we put together a handy dandy chicken breed selection chart to help out.  It tries to combine some of the content of the book, and some from our own experiences.  Of course, some simplification is required in the conversion to flow chart format, so youll have to read the book for more details.


The key to finding the optimum for your own flock is genetics, which Hess feels is best worked out at home. That is, dont rely solely on commercial hatchery strains to get what you want--do some experimenting on your own! A diverse flock is one way to balance these variables, and gives the homesteader more genetics to choose from when refining preferred traits across generations of chickens. Of course, many hatcheries carry their own genetic lines, and, if youre going to start with hatchery birds, it helps to start from hatchery strains that have been geared toward production rather than appearance.  Or, another way to look at choosing your chickens:


However, for all the emphasis on selecting and refining good genetics, the how-to of implementing these points is the weak part of the book. Hess mentions hatcheries (especially non mainstream hatcheries), swap meets, and trades with neighbors as suitable ways to introduce new genetics, but she doesnt say which overall method or which hatcheries she prefers.

Similarly, although to a lesser extent, the section on refining flock genetics could be expanded. The book doesnt say explicitly how often new genetics should be brought in, although Hess Incubation Handbook recommends bringing in a new rooster every year. Also, Hess clearly records a lot of observations about her chickens. Maybe its just us and our nerdy love of data, but we thought it would have been helpful to see a photo of her chicken lab notebook or a screen shot of her chicken spreadsheet to see what kind of system shes worked out to discern chicken performances in terms of feed consumption (and egg yolk/chicken fat color), egg production, and behavior traits.

However, these shortcomings are overall quite minor. The information on different breeds and the approach Hess lays out for getting the most bang for your chicken buck make this book another great addition to the Permaculture Chicken series and an outstanding value, especially considering the price. We highly recommend it!

What kind of chickens do you raise on your homestead?  Which breeds, varieties, and strains have you found to be most productive for meat and eggs?  Let us know in the comments section below!


Read More..

Rabu, 15 Juni 2016

Today is the last day for our fall crop of meater chickens.  We were originally planning to do all the processing in-house, but found out that our local ordinances explicitly forbid livestock butchering because...well, were not really sure why.  Probably some city official is worried about raccoons and dogs finding the offal and dragging it around the neighborhood.  Anyway, we looked for other options, and found a (fairly) local farm that will do it for $3.00/bird if we stay and help.  Not too bad, and very nice folks.  Now we just need a way to transport the chickens there and keep them calm and contained while theyre waiting for their turn at the cone!

Fortunately, weve collected a bunch of pallets for a project just like this.  Here we start with one like this, but if we were luckier, we could have found one with the board closer together.
But we werent luckier, so now we have to fill in the gaps with boards from a different pallet.  If we were lucky at all, wed have at least found pallets that were the same width!  Oh well.  At least they were free!  Were only going to use half of the pallet for this project anyway, so having a few boards that dont go all the way across isnt a big deal.
We screwed the new boards in place and cut down the the far side of the middle runner.  Notice that theres a bit of the runners sticking out toward the top of the picture.  Thats because we wanted to make it the same length along the sides as the pallet boards were going to use for the walls, which in this case is 40".
We cut the runners to the right length and used more pallet boards to make corners.  We made the boards 24" long so that the height from floor to the top would be about 20".
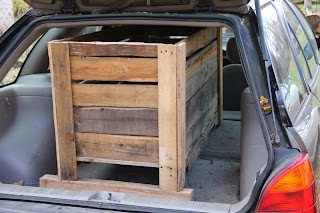
Here it is with more pallet boards as the walls.  No cutting required for the long sides!  Note that the quick part of the title only applies if there are a lot of already-deconstructed pallets around.  Also note that the boards arent stacked super tight.   That lets the chickens get some air, and it lets us use up some of the crummy wood that split while we were deconstructing the pallets.
Fit test #1: Pass!  Plus theres enough room for the cooler alongside!  With the seat down in the Saturn, the front is higher than the back, so we added a hunk of 4x4" to level it.
Fit test #2: Also pass!  All eleven fit in there comfortably.  We could actually fit four or five more, but it would be a bit tighter.  We could have probably made it a bit shorter also.  Fit test #3 is that we can lift it with all the chickens inside.  The tote itself probably weights 30 lbs., and the chickens are probably another 40 lbs. (Well know in a bit!)  Fortunately, Katie is strong like whiskey!
To keep it dark (which calms the chickens), we could make a wooden top with a hinge, but it also works fine to just use a blanket.
Check back on Thursday for the final stats on our fall batch of chickens!  Well have all the numbers crunched and post our weights, costs, and average conversion ratio.

How do you transport your chickens?  What do you do to keep them calm while theyre awaiting processing?  Let us know in the comments section below!


Read More..

Selasa, 07 Juni 2016

At our homestead, we have three places for chickens to hang out, depending on the circumstances.  We have the row cover chicken tractor, which fits neatly over our garden beds, but doesnt have enough predator proofing to keep the chooks safe overnight.  Then we have the A-frame chicken tractor, which is pretty predator proof, but doesnt have much room for nest boxes (which we need now that theyve started laying).  Lastly, we have part of a shed that shares a wall with the garage.  It doesnt give the chickens free access to the grass (yet), but it gives them the most space to move around, the best predator protection, and, well admit it, its easiest on us.  (We still herd them out to the yard every time we have a few hours.)

A couple weeks ago, our Easter Egger caught us off-guard by starting to lay at 19 weeks old, followed shortly by the Rhode Island Red.  How did they know what to do?  We didnt even have our nesting boxes ready!  We clearly had to get the boxes built ASAP, and we took the opportunity to rearrange the shed coop and get the positive energy flowing more smoothly.


This is what the coop looks like from the outside, after rearranging.  We dont have a picture from before we reorganized it because its probably bad karma to publish such things.


On the innermost corner, we built a platform, supported between two studs and on some pruned buckthorn trunks.

Then we built a nest box or three to go on the platform out of old fence wood...

...set it on the platform, and filled it with some of the straw-like tall grass from the yard.  This setup must be ok, the first egg was laid in it 20 minutes after the chickens first saw it.

Then we added a roost above the nest boxes.  As its shown in the picture, the poles are too close together.  Were going to fix that soon.  But its better than the 2 x 4s we had hanging from the ceiling before this renovation!  We also built a droppings box out of an old 1 x 12 and some fence pickets, which helps keep the top of the nest boxes clean (shown in picture below).

The chickens can all fly up to the platform, but we have a pallet ladder to make it easier for them.  Some of them also seem to like the challenge of climbing the ladder and shuffling across the other stick to get to the platform.  We havent heard them cluck the Mission: Impossible theme yet, but theyre getting there.  Also notice the chicken feeder full of grit hanging underneath the platform, and the oyster shell dispenser behind that.  How bout that use of vertical space?

Good job, ladies.  Mission accomplished.

How do you make the best use of your coop space?  Let us know in the comments section below!


Read More..

Sabtu, 28 Mei 2016

We got back the other day from a wonderful trip home to Wisconsin to visit family and friends.  We usually make the sixteen-hour drive to and from Denver in one shot, alternating shifts and driving through the night.  Preparations for being away typically entail making snacks to keep us awake, packing clothes, gifts, and other food, and finding someone to check in on our chickens.

Fortunately for our chicken-checking volunteers, the chickens are generally well behaved.  But what happens when, a week before the trip, one of the chickens gets injured and needs extra care?  Talk about a wrench in the plans!

We were going to cull her, but the injuries didnt seem to involve any vital systems, the only serious symptom being that she couldnt walk very well.  We kept her in a 10-gallon tote in the laundry room for the week leading up to the trip, and she seemed like she was intent on eventually making a full recovery.  Plus, we had just spent six-plus months rearing her into egg-laying shape and culling would have meant a lost investment on that end.

So, we decided to take her with us.

Thoughts of driving through a feather-filled ruckus from a panic-stricken bird, of inconveniencing anyone we visited, and the possibility of an overly-interesting traffic stop aside, we decided it would be a shame to cull her, and hard to ask our chicken-care volunteers in Denver to take on this extra burden.  Plus, what if she took a turn for the worse or had other unexpected problems?  At least if she was with us, wed be the only dumbfounded ones.

Chicken setup in tote in laundry room.  Feed and water containers supported on wire hooks over edge of tote.  Water (yogurt) container has poultry nipple on bottom.  She hasnt even tried to escape, except on the second day in the tote when she somehow got out to lay an egg on the kitchen floor, but couldnt get back in.


We made room for the tote in the already-jam-packed car, packed a little extra food, and hit the dusty trail.  1000 miles and four states later, she was still happily doing chicken stuff and seeming ever-so-slightly more healed.  Since we drove most of the way through the night, she just slept, only making some annoyed chicken sounds because of the bright lights when we stopped for gas. She generally just hung out in the back seat, better-behaved than any human under the age of ten (and most humans older than that).

The tote fit nicely behind the drivers seat, and the cooler fit sideways such that the passenger seat still reclined.  That was critical for through-the-night driving!


In the time we were home, she stayed in a dog kennel in a heated garage (sans dog, of course), got to free range--or rather, free-hop on her one good leg--on some choice Wisconsin pasture (a rarity for this time of year!), eat some aquaponic lettuce, see four different relatives houses, and entertain a cadre of young cousins.  And through it all, she was the definition of stoic.

The lesson?  If your chicken is more chill than Cub Foods-brand soda, dont be afraid to travel with it!  It was easier than traveling with a dog, and chickens dont shed.

Heres hoping she continues to recover and starts laying eggs again sometime in 2015!

Have you ever had to travel with chickens?  Do you have any funny stories or helpful tips?  Let us know in the comments section below!


Read More..

Minggu, 22 Mei 2016

If you have chickens in a cold climate, odds are high that youll eventually want a device to keep their water from freezing. (The alternative is to take them fresh, unfrozen water multiple times per day, which quickly loses its novelty.)  Thats the situation we found ourselves in last winter when the temperature suddenly dropped to overnight lows of -10 °F.

A quick search of the internets revealed a ton of potential solutions, especially for bowl-type waterers and relatively mild climes.  There are fewer solutions to keep nipple-type waterers from freezing, but a few options weve seen include adding poultry nipples to a heated bucket and heating a larger reservoir that then gets circulated through a tube-type waterer and across the poultry nipples.  We also saw mentions of using a heat tape, an aquarium heater, and a stock tank de-icer to keep a bucket waterer thawed.  Those latter two options sounded pretty good to us.  Time for some research to decide which one is better for us!

There are many opinions on using aquarium heaters in chicken waterers.  Some caution against it because water can sometimes leak into the chamber with the heating element (leading to electrified water that can shock chickens or chicken keepers) and the glass on some models can shatter if the water level gets too low.  Other folks say they work great for several years and encourage the chickens to drink more water during cold weather (which, they claim, leads to better egg production and healthier--or at least, more hydrated--chickens).  The risk of electrified water can be minimized by using a GFCI outlet (which really ought to be used with any electrified chicken waterer), and the risk of shattering glass can be minimized by using non-glass or shatter-resistant glass heaters with automatic shutoff features (although, be careful about using titanium heaters in a plastic bucket because they can get hot enough to melt some plastics).  A 50 W heater is often times specd out for 5-20 gallon aquariums, so it should be plenty powerful enough for a normal-sized chicken waterer.  Also, while were certainly not experts on aquarium heaters, we noticed that the opinions cautioning against using aquarium heaters in chicken waterers tended to be based on years (and years and years) of experience using them with fish, which doesnt necessarily account for many of the features that have become standard in recent years (i.e., plastic, metal, or shatter-resistant glass construction and automatic shutoffs).  Many aquarium heaters now carry lifetime warranties.

Meanwhile, stock tank de-icers keep the chicken water just above freezing, the smallest ones are 250 W, and they carry a 2-year warranty.  For those of you who keep track of such things, that means the power consumption is equal if the tank de-icer is on for one-fifth the time of the aquarium heater.  Also for folks living in the coldest climes, there is some anecdotal evidence that keeping the bulk of the waterer slightly above freezing isnt enough to keep the nipples from freezing.

Both a 50 W aquarium heater and a 250 W stock tank de-icer cost about the same, but in our minds, the aquarium heater seemed like a slightly better option.  Phew!  Decision made.

Ok, with all of that discussion out of the way...on to some pictures to demonstrate the reduction to practice!

This is the model we went with.  Last year, we had it in a 2-gallon bucket, and it was too long to sit flat along the bottom.  It worked fine (keeping our water at about 70 °F with outside temps frequently at 10 °F and lower), but we wanted to get it into a 5 gallon bucket so it would stay covered with water until the bucket was almost empty, and so that the heater would be close to the nipples, making it easier to keep them thawed.  NOTE: As luck would have it, our heater was probably breaking as we typed this.  We were home in Wisconsin over Christmas, and returned to Colorado to find an empty water bucket with a small hole melted in the bottom and a burnt rubber smell inside, and a cracked (but not shattered!) aquarium heater.  We didnt have it on a GFCI plug (do as we say, not as we do...), but obviously we cant recommend this heater anymore.

We drilled holes and installed the poultry nipples in the bottom of the bucket, leaving a space for the heater in the middle.  Also, for what its worth, lots of folks seem to recommend drilling 11/32" holes, but we usually go with 5/16".  Its a little snugger fit, which makes it harder to thread the nipples into the bucket, but might help with preventing leaks. Also, 5/16" is a lot more common drill bit size.  For real cowboy construction, its possible to slightly enlarge the hole by making the drill bit sightly off-perpendicular and rotating around, but be careful not to make it too big!

Next, in goes the heater!  Youre not imagining it--we cleaned it up between the first picture and this one.

We picked this spot to cut an opening for the cord in the lid.

A few snips with a wire cutter, and voilá! Cord-accessible.

The cord goes out the bucket and trails off through the hole that provides access for the garden hose in the summer.  On the outside of the coop is an extension cord, eagerly awaiting a plug.

A couple S-hooks make it easy to connect the bucket to the chain its hanging from.

And heres the finished product.  The chickens are clearly intrigued with the new deluxe model.


Whats your heated chicken water solution?


Read More..

Senin, 02 Mei 2016

We found out the other weekend that wire mesh movable electric fences (one of these guys) and lawnmowers dont get along very well.  While trying to get into a tight spot behind the bee hive, the lawnmower managed to reach out and pull one slightly-less-than-taught section of the fence into the blade.

Heres a question for you: given that it takes the human brain around 0.2 seconds to process a stimulus and react, that the lawnmower blade spins at 200 rpm, and that the fence cost $165, can you calculate how many dollars per blade revolution the lawnmower did?  Ready, go.

Easy, you say?  0.2 seconds equates to 2/3 of a revolution, and the fence was obviously destroyed, bringing the total to $247.50 per revolution?

Wait, theres more information: first, we didnt have the fence electrified and werent planning to since it kept the chickens in just fine without electricity (until we put a big hole in it with the lawnmower), and second, we saved the wire wrapping that our rolls of hardware cloth and woven wire fencing came in, along with plenty of other wire scraps.  Turns out that, as long as we still dont want to electrify it, the cost was more like an hour of Jakes time, or basically, $0.00.

We started by laying the damaged section of fence as flat as possible, figuring out what strands were missing, then replacing the vertical missing vertical strands with pieces of 16 gauge wire.  Where there were a few remnants left, we tried to wrap them around the new wire.  We also fed the new wire through the horizontal strands when they were still intact.

Similar drill for the horizontal wires, except using the thinner wire that the hardware cloth roll was wrapped up in.  Our thinking is that the thinner wire will make it more flexible in the horizontal direction when we eventually roll up the fencing.  In extra-damaged places (like in the first photo), we wrapped the horizontal wire directly around the new vertical pieces.

The finished product doesnt look perfect, but it does keep the chickens out of the garden.  Will it ever be electric again?  Hard to know.  If we decide to try it, well update the post.  In the meantime, mission accomplished!


How do you do electric fence netting repair?


Read More..

Rabu, 27 April 2016

Last fall, we wrote about a chicken tractor we built to fit directly over our (at the time) only garden bed.  We hypothesized that the inherent stiffness of the woven wire fence top would provide some structural integrity, and help shed the snow off to the sides before it could pile up.  Unfortunately, we put too much faith in the fencing material, and one heavy snow was all it took to buckle it.  When we got some time this spring, we made a few improvements to it that will hopefully help it survive this next winter in a little better shape.


When it happened the first time, we put a stick in the middle to hold up the wire.  It worked for a while, as long as we only got snow in increments of one inch or less.  (Also, we didnt figure out a good way to close off the ends in time, and our kale died. :-(  In the spring, we found that covering the ends with garbage bags and holding them in place with sticks was a workable redneck solution for the coldest nights.)

When the heavy snow came, it pushed the stick right down into the dirt and buckled the fencing anyway.  (An unintended consequence of double digging in the fall!) Time for some repairs!

In the spring, we bolstered the structure with a 2 x 4, in which we cut grooves in the ends and screwed it into the hoop parts.  We couldnt find one quite long enough, so the far end has a couple of bridging pieces to cover the extra distance.  A real craftsman would have found the right length board, and put it in the center of the hoops!

We also upgraded the mechanism for moving the chicken catcher piece.  Its now fixed to a rope that goes from end to end, suspended from the main beam by screw-in eyelets.  Now we can just pull on one part of the rope to herd the chickens toward us, and on the other part to give them more room...and all from the comfort of the door side of the tractor!

Heres a shot of how the eyelet hangs at the door end.  Doesnt look like much, but it was cheap, and it works pretty slick.  Those are our two primary concerns.

How do your chicken tractors or row covers hold up in the snow?  Have you had to make any improvements to their structural integrity?  Let us know in the comments section below!


Read More..

Rabu, 20 April 2016

On Thursday we wrote about our brand-spankin new pocket rocket stove and how excited we were that it was working.  This weekend we put it to the test with a task wed been saving for a long time: turning the leftovers from chicken butchering (or more precisely, from chicken roasting and shredding so theyd all fit in our freezer) into calcium- and phosphorus-rich biochar.

Todays objective: get rid of this without throwing it in the trash or stinking up the neighborhood.  Katie says, "Youve been saving that since November?!  Eww!"  The smell is...less offensive than expected.  Theres also some bonus biomass to process, and fun colors, too!

Step 1: Get a roaring fire going in the pocket rocket on top of a good bed of coals.  Notice we added the concrete blocks around the sides for extra stability this time.

One foolproof way to see if the stove is drafting correctly is the old marshmallow test.  If you can roast a marshmallow above the chimney, its drafting correctly.  We recommend this test be performed during every burn.

Step 2: When the fire is burning really hot, add a little bit of the chicken waste.  Its hard to set a hard ratio of wood-to-chicken, but if you try it, youll get the hang of it pretty quickly.

Theres something oddly poetic and at the same time Terminator-esque about pyrolyzing chicken bones.

When things are burning well, theres no smoke.

If the fire gets too cold, say, from adding too much wet chicken material, the smoke is kind of white, but not really acrid like one might expect.  We found that adding a handful of loose, very dry leaves usually fixed this situation since the leaves would ignite and burn hot for a few seconds, which was enough to get the wood back on track.   Hopefully no one thinks theres a new pope--we kind of like this Francis guy.

After about five hours, the bucket was full enough of char and ashes that it became difficult to scrape the coals away from the chimney opening to keep it drafting properly.  We let it burn for a little while without adding any fuel, which allowed the chimney to cool down enough that we could pick it up with insulated leather gloves.  The top of the bucket came right with it.

Then we dumped the hot biochar into another steel bucket.  You can tell this ones different because it still has paint.  Then we started over with re-lighting the stove.  Probably we could have also scooped some of the hot coals from this bucket back into the first one to light the next fire and saved a few minutes.

And there you have it: chicken-flavored biochar.  You may use that as the name of your garage band, if you like.  After about 10 hours, we had all of the chicken waste taken care of, and got a little less than one five-gallon bucket worth of char and ashes.  That works out to about one chicken per hour at this scale. Also, a word of caution: even 24 hours later, combining the ashes into one bucket, they were still hot and had some glowing embers.  Dont store them too close to combustibles!

Some of the bones are just charred, others have had all the carbon burned out of them, leaving a fragile ash matrix.  Both will be very good for the garden.  None of the nearby houses started on fire, and none of the neighbors came over to complain (which would have certainly followed had we failed on the first goal), which means we went two-for-two on the day.  Success!

Have you made biochar before?  Whats your setup?  What do you do with chicken leftovers?  Let us know in the comments section below!

Read More..

Jumat, 15 April 2016

There are lots of ways to raise chickens in ones backyard: free ranging, rotational pasturing, tractoring, etc.  Meat breeds tend to eat a lot of feed and gain weight quickly, and those traits have come at the expense of foraging behavior (cornish cross, were looking at you).  One way to get those meat birds out in the fresh air a bit while forcing the little butterballs to eat some greenery (and poop around the yard instead of two feet from the feeder) is to put them on a bit of a diet and move them around in a chicken tractor.

So it was with our spring batch of chickens this year, and, as is our modus operandi, we wanted to put together a functional chicken tractor for the lowest cost possible.  We got all the wood for free from Craigslist, which saved us the majority of the price of constructing a tractor from all new materials (woo hoo!) We managed to construct a pretty robust mobile chicken fortress, although it is somewhat more of a workout to move around the yard than we were hoping for.  But here are our design details, judge and improve upon them as you see fit. (And leave suggestions in the comments section!)


Heres the general framing.  The base is made from 2 x 6s cut halfway through where the perpendicular pieces come across, leaving a 12" overhang to support a weasel skirt, described below.  (Kind of like Lincoln Logs.) The base boards are 10 and 7 for the long and short sides, respectively, giving an internal dimension of 8 x5, or 40 ft2.  The A-frame part is 2 x 4s, cut at about a 60° angle.  We tried to design it such that wed be able to lift it ergonomically (i.e., by shrugging our shoulders), for which we calculated that at a height of 27.5", the handles, which would be situated at the outside of the triangle frame, would be 28" apart (similar to a wheel barrow).  For this application, 28" was probably 4" too wide, but we ended up needing more than a shoulder-shrug worth of height anyway (see below).

A close-up of the top edge.  The hardware cloth is one big piece from side-to-peak-to-side and a triangle piece across the end, with a few of the trimmings from the triangle used to fill in the gaps at the bottom of the triangle.

The handles went on the back, cut into the A-frame boards.  See five pictures down for a peek at how theyre secured on the inside side.  The roof part and the back wall are cedar fence pickets.  The hardware cloth around the base (the weasel skirt) keeps digging predators out.  Neighborhood dogs and foxes, good luck!  May your claws be ground down to useless nubs before you eat our chickens.

On the front end is a go-kart (or dunebarrow) tire, with the wood supported by a piece of angle iron.  Cutting the bottom corner off the board makes it a lot easier to move around, although we could have helped ourselves out even more by putting the axle lower than we did.

The weasel skirt is held in place by some more old fence pickets.  Otherwise the inside edges tend to catch on the grass and get ripped off the boards.  The downside to supporting them this way is that the tires on the front end are now elevated, which means the back end needs to be raised even higher for the tractor to roll (like, at least two feet).  Lifting it too high lets the birds wander out as the tractor is being moved, but for cornish cross, thats ok.  Theyre not hard to catch.

On one side is a kind of Dutch door...

...that opens to allow access to birds or food and water buckets.  Opening the door panels also reveals exquisitely-calculated brace pieces!

Birds-eye-view (heh) through the top door.  A couple extra 2 x 4s provide a place to hang food and water buckets.  It works well for meat birds that dont really roost, but for lighter breeds, theyll roost on the center board and poop on the bucket lids.

Heres the view from the front...

...and other side for completeness.

Lastly, a word on wasting feed. The cornish cross are motivated by one thing: hunger.  In this picture, the general outline of the feeder end of the tractor can be seen, with a big pile of wasted feed in the lower right corner.  The birds should be moved every day, even if theres good food available on the ground (the rest of the outline is their mess!). But theyll waste a lot if given free choice food all day long.  Yes, it will break down and end up feeding the pasture, but thats some expensive fertilizer!

In contrast, giving them a little less than they want will make for a lot less wastage.  Youll have to figure out where the magic amount of daily ration is for your flock.  For us, about 4 lbs per day for 10 birds was about right.  Theres definitely still some visible in this picture, but if theyre hungry, theyll spend their time eating the stuff off the ground instead of sitting around pooping on themselves.  (Theyll probably still do that, too, but to a lesser extent.)  We even saw one eat a dandelion leaf once!

What does your chicken tractor look like?  How do you keep it light enough to move around the yard easily?  Let us know in the comments section below!


Read More..