Tampilkan postingan dengan label and. Tampilkan semua postingan

Sabtu, 02 Juli 2016

Ending hunger means more than just providing enough food and calories for everyone. Side by side with the need for sufficient food to live an active life is the need for the right foods — for good nutrition. A diet drawing from all food groups that is rich with vitamins and minerals is crucial for the health, growth, and strength of both bodies and minds. Focusing on women and young children is important because these groups are the most vulnerable to hunger and malnutrition. Nearly half of the world’s smallholder farmers are women, with higher rates in developing countries.   -Bread for the World
Our 2016 Offering of Letters Campaign, "Survive and Thrive," urges Congress to prioritize support for maternal and child health programs, emphasizing nutrition. Goal 3 of the Sustainable Development Goals  is to ensure healthy lives and promote well-being for all at all ages. It includes targets to reduce global maternal mortality and to end preventable child deaths.

Malnutrition is the cause of 45 percent of all preventable child deaths and contributes to many maternal deaths.

Through the 2016 Offering of Letters, churches would urge Congress to increase funding for the nutrition and health of mothers, newborns, and young children. In 2015, funding for nutrition in the global health account was $115 million—a slight increase from previous years. Bread and its partners believe a funding level of $230 million for nutrition programs is needed for 2016. Increasing U.S. investment in global maternal and child nutrition is central to successful development and helps improve the potential of millions of people.

As part of our campaign, we will urge Congress to pass the Global Food Security Act, which continues U.S. investments in improving nutrition and increasing the productivity of smallholder farmers. For example, food-aid reform will also provide an opportunity to improve nutrition among mothers and children. There will also be an international Nutrition for Growth summit this summer in Rio de Janeiro, Brazil. There, governments could decide to make significant new political and financial commitments. Bread is urging Congress to push for those commitments. 

Albuquerque Offering of Letters Workshop
Stay tuned for details about the Offering of Letters workshop in Albuquerque, scheduled for Saturday, March 12, 2016.  Last year, 20 churches generated more than 2000 letters to Congress in support of efforts to increase domestic nutrition programs.  
Read More..

Selasa, 28 Juni 2016

Photo montage from ONE
The Electrify Africa Act  is now law. The initiative directs the President to establish a multiyear strategy to assist countries in sub-Saharan Africa implement national power strategies and develop an appropriate mix of power solutions, including renewable energy, to provide access to reliable, affordable, and sustainable power in order to reduce poverty and drive economic growth.

There are many people to thank for helping to make this happen. Over four years, ONE members worked tirelessly to turn an idea into a law.

Sherif Aboubakr and Jielin Pan staff ONE table at UNM?
With petitions, letters, tweets, and in-person meetings, ONE members continued to raise their voice in support of this bill. This included a group of students at the University of New Mexico, who set up a table at an international fair on campus in 2014 to gather signatures to be sent to Congress.

Members of Congress played a key role as well. Many worked across party lines, and across Chambers, to build a strong bipartisan bill built on private sector partnerships. Electrify Africa would not be the law it is today without their hard work and support.

Take a minute to send a note of thanks to Congress. 
Read More..
Guess what!  Katies learning to be a magician.  Her first trick involved dried chickpeas!  Now we have a tasty dip for all our veggies!  Check it out:

She started with some regular ol dried chickpeas.

Then soaked them overnight in the crockpot. The next day, she turned the crockpot on and cooked them for another 12 hours or so until they looked like this.  She saved some of the liquid to alter the consistency of the hummus if necessary.

Then she added about two cups to the food processor thing, along with three cloves of garlic.  One clove she crunched in the garlic press, then she realized that it was going to get chopped up in the food processor anyway, so using a hard-to-clean tool was silly.

Then she chopped up everything in the food processor until it looked like this, adding a couple tablespoons of chickpea water to get the consistency she wanted.

Then she added the rest of the ingredients: salt (~1 teaspoon), pepper (~0.5 teaspoon), hot sauce (4 squirts), and olive oil (3-4 tablespoons).  Not pictured: lemon juice (2-3 tablespoons).  Go easy on the lemon juice at first, because it can easily overpower everything and make the hummus not taste right.

Then she added about a third of a cup of sunflower flour.  Last time she ground up the sunflower seeds with a mortar and pestle.  This time she used a coffee grinder.  Most recipes call for tahini (sesame seed paste) since the hummus is actually short for hummus bi tahina, or chickpeas with tahini in Arabic.  We had sunflower seeds and not sesame seeds, so consider this hummus bi abed-i-shems.

Taste testing is an integral part of this process.  First she tasted the isolated hummus using a model vegetable.

Then she tested with a real vegetable.  It passed both tests.

Then she put it in a jar and set it in the fridge.  Shes not sure how long it keeps because weve always outcompeted the bacteria for it!


The Recipe:
2 cups cooked chickpeas
3 cloves garlic
0.5 teaspoon pepper
1 teaspoon salt
4 squirts hot sauce
2-3 tablespoons lemon juice
3-4 tablespoons olive oil
1/3 cup ground sunflower meats
1 finger for testing
1 vegetable stick for testing

Soak overnight, then cook chickpeas, reserving water.  In food processor, puree chickpeas and garlic, then blend in remaining ingredients except finger and vegetable stick.  Use finger to test flavor and consistency, adjust as necessary by adding water or more chickpeas.  When hummus passes finger test, use vegetable stick for further testing.  When flavor is satisfactory on both accounts, transfer hummus to canning jar and store in fridge.


Do you make your own hummus?  Whats your recipe?  Let us know in the comments section below!

Read More..

Senin, 27 Juni 2016

Winter returned with a vengeance this week, dumping two 8+" storms on us, and never really stopping in between.  Its sunny today, but were supposed to get another couple inches overnight and tomorrow.

As a result, the homestead looks like this, and most of our time was spent getting to and from work.  However...

On Friday, a large round of robins descended upon our boxelder tree, probably to discuss why they were in such a hurry to head north.  Theres at least two dozen of them there, and probably more hiding behind the snowy branches.

Look at em all in there!

It sure doesnt look like spring, but theyre here!  A tell-tale sign that the actual spring is not far behind, which is good enough for this week.

Read More..

Minggu, 26 Juni 2016

Todays Readings
Genesis 15: 1-12, 17-18, Psalm 27, Philippians 3:17-4:1, Luke 13:31-35 or Luke 9:28-43


Read More..


Quarterly Meeting on Tuesday, February 9  12 Noon

First Presbyterian Church (I-25 and Martin Luther King Blvd.)

Alissa Barnes, director of Community Initiatives at Roadrunner Food Bank, will talk about the food banks new program on health and hunger.  Alissa is a member of the Interfaith Hunger Coalitions Advocacy Committee.

Our Education and Advocacy Committees will also present updates of their work over the past several weeks.  We are also seeking volunteers to serve on a committee to plan an Interfaith Service for World Food Day on Sunday, October 16, 2016

https://blogger.googleusercontent.com/img/b/R29vZ2xl/AVvXsEibl632FZ9rOiDf7NQhK2-EP6GQbQ1zP9L07OyM2fcX0KiHRMyeQc4KlFdxihe3d_TOsK4bYWI5DC0BM2xv7L4uXScYddJRUwB-b4iwwzbAwbpb-9ldbg7XYbSxi4QlXOy_Scjrzxqj8rJi/s320/FarmDay2.jpg

Data shows us that food insecurity and health go hand in hand. Food-insecure individuals are more likely to experience colds, stomach aches and migraines and suffer from generally poorer health than food secure individuals. In 2014, Feeding America conducted the Hunger in America study and found some staggering statistics  about New Mexico’s pantry clients:

  • Nearly half (46%) report being in poor or fair health;
  • 59% report choosing between paying for medicine or medical care or buying food at least once in the past 12 months;
  • 44% of hungry households said they have medical bills to pay, and;
  • 75% report purchasing inexpensive, unhealthy food as the most common way to have at least some food at home to eat.
As a food bank , we are focused on addressing Health and Wellness and leading in the national trend of food banks partnering with health organizations. We were pleased to share some of our Health and Wellness Initiatives with the Beyond Flexner Conference.  The conference brought a group of medical students, educators, and physicians together  to discuss social determinants of health.

More information in these links:
Healthy Hubs – Partnering with Organizations to Increase Health Outcomes
Working Together for a Healthy and Well Nourished New Mexico
Healthcare and Food Delivery Advisory Council Meeting Report
Read More..

Sabtu, 25 Juni 2016

We wrote a couple weeks ago that we used the shook swarm method to put our bees on fresh comb and hopefully help them shake their case of EFB.  So the bees got some new digs, but what happened to the rest of the hive--the honey, combs, frames, and hive bodies that were contaminated? The whole process would make for a very long blog post, so well break it up into a couple posts.  But to whet your appetite, heres the overall schematic:

This whole ordeal is a zero-waste process, which is nice.  On tap for today: frames and comb, in particular, wax rendering.

Were continually adapting our wax rendering process.  Version 1.0 we wrote about before, and was more of a treatise on how not to render wax.  Version 2.0 is a solar melter frankensteined together from parts of our cold frame.  The back is a piece from the brooder box, and the places they dont fit perfectly together are plugged with fence panels.

Inside is a regular Langstroth box with a couple 9" x 13"-ish aluminum pans, each with about an inch of water in the bottom (to keep the wax from sticking to the pans).  On top is our winter-time bee feeder...

...which is lined with an old t-shirt and has another Langstroth box stacked on top.

The combs to be melted get piled on the t-shirt, and the melter is covered by the windows from the cold frame, which are stacked to make a double-glazed top.  The windows should be washed to maximize the amount of sunlight that gets through (ours werent), and every crack and crevice should be sealed tight because when it starts to heat up, every honeybee within smelling distance will be drawn like a magnet. 

We set the whole thing up on the garage roof since it gets intense sun for most of the day.

A few days later, the combs are mostly melted down...

...but the yield of wax is a little disappointing.  A couple things probably decreased our yield.  First, the t-shirt filter held up a lot of the wax itself.  Other folks have had better luck with a paper towel.  Second, the temperature should have been higher.  We added some reflective insulation around the walls, which helped, but not enough.  More insulation and a more airtight construction would have been better.  We could have washed the windows, which would have helped even more.  As it was, we got readings up to ~155 °F inside the box when the glass was on.  Good enough to melt the wax, which happens at ~145 °, but hotter would be better.

Also, when we tried a deep Langstroth box full of frames, we only got minimal melting

Plus, during the time spent with all our rejiggering, we found out that bees arent the only bugs interested in the wax.  Ants and earwigs love it, too.  But at least theres a silver lining: if you want bespeckled wax, the sprinkles are free!  The final takeaways from version 2.0?  There are some kinks to work out, but theres good potential.  Significant improvements wouldnt be too difficult if we could find the time to properly build a solar oven (which is on the to-do list anyway), but that will have to wait until a future date.  Also, some folks have noted that from some old combs, solar melting, even in a well-designed system, doesnt cut it.  Those combs need steam to release the wax.

Enter version 3.0.  Its inspired by a few other designs weve seen and Keiths comment on our original wax melting post.  The core is a big pot with some water in the bottom, and an aluminum pie pan boat.

That goes on top of the rebuilt Dakota Rocket Silo, which is burning the contaminated frames (and other wood).

A t-shirt filter is secured to the top of the pot.  The combs go in the filter.  The idea is that the steam rises up and condenses on the combs to melt the wax.  The wax is supposed to drip off the lowest point on the t-shirt into the pan below.

The first part of that works well.  The wax melts in half an hour to an hour if the fire is really roaring.

Unfortunately, it also runs down the side of the pot, so in addition to the nice wax cake we get in the pie pan, theres also a layer in the outer pot.  (This picture is from the following morning, after everything had cooled down.)  What we really need is some kind of impermeable insert in the top of the pot that prevents the t-shirt from contacting the pot directly, but that has a hole in the middle to direct the wax to the pie pan.  Probably could be done with aluminum foil. 

Also, we should point out that the wax accumulating on the water in the big pot can be a little dangerous because when a full layer of wax forms, it prevents the water from evaporating normally.  The result is that the water gets super-heated and instead of boiling steadily, it bumps violently, and then does nothing for a few minutes, before bumping violently again.  (The same thing can happen in your microwave if the water is very still while heating.)  When the bumping was happening in our setup, it was actually able to move the pot around, and if we hadnt been watching, it could have tipped over into the fire.  Since the wax is flammable, that would have gotten exciting quickly!

In any case, the melted wax and water can be poured into a pan to cool down.

The wax will form a cake on top, which can be easily removed.  We had a lot of comb to melt, so we ended up with several of these cakes.

To make them more compact, we built a makeshift mold, lined it with aluminum foil, and stacked pieces of the cakes inside.

When the summer heat had broken, we melted it in the oven at ~150 °F.

On cooling down, it solidified, at which point the foil and wax can be removed from the box.  The foil should readily peel away from the resulting block, leaving a nice chunk of purified beeswax to play with.

The stuff that got filtered out (slumgum) can be composted, used to start fires, or used to make swarm traps more attractive.  Since we started this whole ordeal to get rid of EFB, we wont be using it in our swarm traps.  We tried a few different ways of making slumgum fire starters, including packing it into paper egg cartons, wrapping golf ball-sized portions of it in old phone book pages, and packing a thin layer of it between layers of paper grocery bags.  In our experience, its the residual wax that actually starts burning, and the rest of the slumgum burns, but does more to inhibit the wax burning than to really support combustion.  So, adding additional dry, combustible material like paper, sawdust, or wood chips helps a lot.  Also, getting that extra combustible material to wick up and/or be coated in the wax helps it work under wet conditions.  Once we had everything packed in like we wanted it, we put it in a 200 °F oven for an hour or two to melt the residual wax and get it to soak into the paper. The egg cartons are easily divided, but the slabs with the grocery bags we cut into 1"-2" squares.

The t-shirts themselves can also be cut up to be fire starters, or saved for future use.  Since we dont want to transfer EFB to any future batches of wax, were going with option #1 for the t-shirts this time.

We did a quick trial run of all four of our different kinds of fire starters (clockwise from top: t-shirt, egg carton, phone book, and grocery bag), and we noticed that the phone book page-wrapped slumgum balls were hard to light and keep lit, the wax-soaked t-shirt lit the fastest and burned up the fastest, and the egg carton-slumgum and paper grocery bag-slumgum fire starters had good longevity but could still be easily lit by a match.

Finally, a quick note on cleaning up the wax.  Many folks caution that its nigh-on-impossible to clean up cookware items that have been contacted by the beeswax, but weve not found that to be entirely true.  First, the thin coating that forms on pots and pans will eventually wear off in continued use, and beeswax is inert in the human digestive tract, so one approach is to ignore it; no harm, no foul.  Second, weve found that mixing beeswax with some kind of vegetable oil (olive oil, canola oil, soybean oil, etc.) when both are above the beeswax melting temperature (~145 °F), makes a blend that can be cleaned up with soap and water, even when cooled back down to a touch-safe temperature.  And third, a scouring powder, in particular Bon Ami, which doesnt have anything in it that we would be worried about contacting food, cleans things up pretty well.

There you have it!  Our current procedure for processing contaminated wax and frames, waste free.  How to you render and clean up wax?


Read More..

Selasa, 21 Juni 2016

The Circo for the Community fundraiser on Saturday, March 5, will benefit five organizations, including New Mexico Interfaith Power & Light (NMIPL). Here is a preview of a full video that will be shown at the fundraiser, which will also benefit the New Mexico Conference of Churches, La Mesa Arts Academy, the New Mexico Faith Coalition for Immigrant Justice (NMFCIJ) and the Albuquerque Aerialist Collective.  (We posted a video from the NMFCIJ earlier this week).Tickets are $35 and can be purchased on the NMCC site or at the door (you can write a check for any of these organizations). The cost of the ticket includes dinner and a reception.

Read More..

Senin, 20 Juni 2016

So if you follow this blog, you must think I died or quit gardening.  Quite the contrary.  While the rest of the country has been dreaming of gardening, Ive been doing it.

The South Florida growing season is drawing to a close and the rest of you are just getting started,  Here is what worked for me this year and what was a flop!

The Biggest Loser!
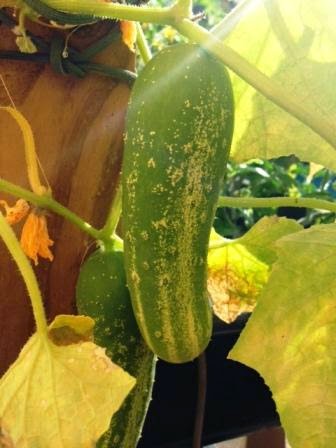
cucumber growing with aquaponicsBy far, the worst performers in my garden this season were the cucurbits!  I am not holding a pity party for them however.  They had much going against them, but they didnt give it much of a try.  I know I was not alone.  During a visit to a local nursery in January I overheard the staff in charge of the vegetable section tell a customer they had no luck with cucurbits either.  Our November was cooler than normal, followed by a December that was not only cool, but it was damp as well.  A quick review of cucurbit growing conditions does not include the terms "damp" or "cool".  I managed to get just a few Straight Eight cukes out of a raft using the Deep Water Culture (DWC) technique.  Growing a vining plant using DWC is always a challenge.  We ran string to get it to the garden frame and then just let it grow from there.  The plants in the flood and drain grow beds never produced at all. I ripped them out in January.  Despite many different attempts, I was not able to get new seeds to sprout.  Zero squash, zero melons, few cucumbers.  Cucurbits were a bust!

The Loser Runner Up!

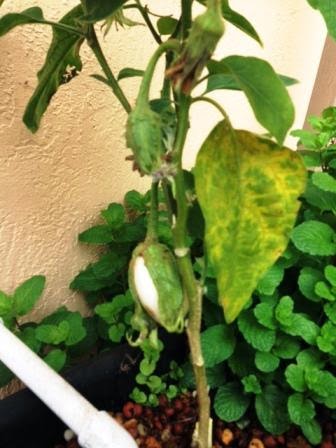
Is there a runner up loser place at the podium?  I dont know if it is official place, but cucurbits were almost beat out by the nightshades as poor performers.  The cool and damp conditions were not embraced by the eggplants.  They were tolerated by the peppers and the tomatoes thrived so the nightshades mixed performance kept them out of the bottom position.  eggplant in aquaponics The irregular weather conditions resulted in problems with chlorosis.  I had to chelate more this season than I have in any season past.  This picture is a perfect representation of the eggplant problem this season.  I harvested less than a dozen fruits.  Usually I can keep eggplant going into May.  This year it was done by February. This is the second year I have grown eggplants relying solely on aquaponic methods. Last year was such a success!  This year not so much.  Next growing season, I commit to growing with and without soil. 
The Good Stuff

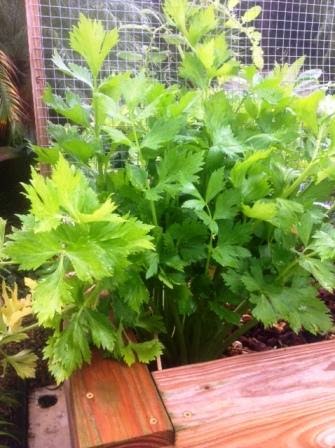
Now for the winners!  I tried celery in a flood and drain bed for the first time.  OK, true confession time, it is the first time I have tried to grow celery ever.  Maybe celery is easy to grow, maybe the cooler than normal temperatures were a factor.  I just know that it grew exceptionally well. It has been tasty too!
celery in aquaponics
So next year I will try celery again and see if it is a fluke.  As an aside, I discovered that celery leaves are pretty tasty when they are young but bitter when they are older.  It is awesome to harvest your celery and then not spend all that time in the kitchen scrubbing the dirt off.  That is an unsung benefit of growing with aquaponics, faster produce cleaning in the kitchen!


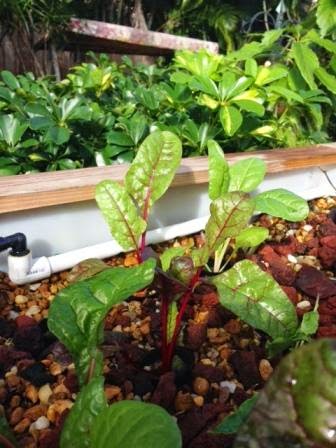
swiss chard in aquaponics
Another big winner were the greens.  I grew kale and swiss chard with lots of success.  The chards took a littler longer to get going this year, but once they got going, there was no holding them back. The chards and kale were grown in both NFT tubes and flood and drain beds.  I didnt try any of these in soil this season.


Last year, the greens in the NFT tubes were the big winners, this year the plants in the flood and drain beds out performed their tube counterparts.  It just goes to show that when it comes to gardening, there are always surprises. 

kale and celery in aquaponics 
This was my first season with Dinosaur kale.  It grows very quickly no matter the weather or light conditions.  Three plants were all that were necessary to provide more than enough for our table of 2.

The Winners!

The winners were the mints, including basil and the peppers and the tomatoes.  I had tomatoes in soil and tomatoes in my aquaponic gardens.  I tried something old, Mr. Stripey, something new, Arkansas Traveler, and something borrowed and blue, Indigo Rose!
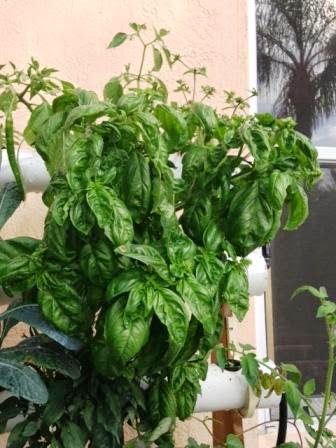
basil in aquaponics
The basil went wild in the NFT tubes.  I had to end up moving a Dinosaur kale to make more room. 

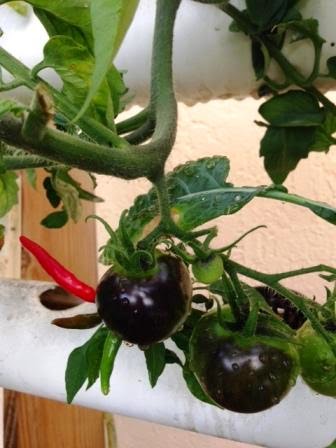
indigo rose tomato and cayenne pepper in aquaponics
 This is an Indigo Rose growing in an NFT Tube with a little cayenne pepper poking out behind it.  The Indigo Rose seeds were from my sons garden in Ohio.  When I visited in August, I opened one of his ripe tomatoes onto a paper towel and spread out the seeds and flesh to dry.  I brought the dried paper towel home and planted it, towel and all in October.  The Indigo Rose was by far the most prolific producer.  I had them in DWC rafts, flood and drain beds and soil.  They performed well in all situations.  The only down side to this tomato is that it takes for-fricking-ever to ripen.  The portion of the tomato that is kissed by the sun turns a bluish purple, the remainder will turn red or yellow when the tomato is ripe. 
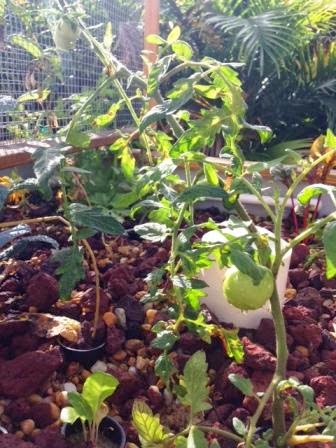
Arkansas traveler tomato in aquaponics
 This was my Arkansas Traveler when it was setting its first fruit.  I only had one plant this year, but will certainly save seeds (using the paper towel method) because this is a great tasting tomato. It doesnt grow extremely large in either plant size or fruit size.  When ripe, it is a pink color.  It is very tasty and low acid.
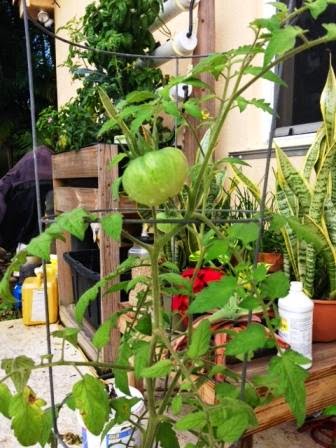
mr stripey tomato
This is a "Mr. Stripey" that was growing in soil in a pot.  A real down side to buying starter plants is that anyone with a sense of mischief can cause problem in the garden center.  I bought this plant as a start and it was clearly marked "Mr. Stripey", which happens to be one of my favorite tomato varieties.  As it began to set fruit, O started doubting the veracity of the tag.  The tomatoes werent as large as they should be and didnt exhibit stark striping.  When the first fruits started to ripen I knew I had been had.  The fruits turned red and not the beautiful orange-ish shade sported by Mr. Stripey.  I dont know who this imposter is, but it produces a medium sized red tomato with very light striping.  Unlike Mr. Stripey, it is very low acid. I am not saving the seeds.  I considered prosecuting it for impersonating a beloved heirloom, but decided the real culprit was the person at the garden center, not the plant.

Inedibles in Closing

  Believe it or not, the winter months arent all about vegetables here at the end of the peninsula.  The shorter days mean that lots of plants start to bloom.  While you are looking at snow, Im looking at kolanchoes.
 Im enjoying the orchid blossoms.
 
And the Bolivian gloxinias start to bloom before Christmas and take us all the way through to Easter.
 
My season was a mixture of hits and misses.  Let me know what you are doing to make your season a success.  Id love to hear from you!
Read More..